


How to Sell on Blinkit? Complete Seller Registration & Onboarding Guide 2026
Quick Summary
Want to start selling on Blinkit in 2026?This guide covers the complete process, from seller registration to going live on dark stores.Blinkit is a quick commerce platform where Blinkit buys stock directly from you and delivers to customers in 10 minutes. New brands start on the SOR (Sale or Return) model, which requires a ₹25,000 per SKU PLA deposit that comes back as ad credits. The full onboarding process takes 7 to 21 working days. This guide is for brands in FMCG, groceries, personal care, beverages, or small electronics who want to sell on Blinkit.
Your Amazon sales are good. Maybe even great. If you’re figuring out how to sell on Blinkit and where to even begin, this guide walks you through the entire process – registration, documents, fees, and go-live.
But have you noticed something? Your competitors are talking about Blinkit. Instagram is full of brands celebrating their “quick commerce launch.” LinkedIn posts about 10-minute delivery success stories.
And you’re wondering: Should I be there too?
Here’s the reality: Quick commerce is not replacing e-commerce. It’s creating a completely new buying behavior.
Think about it. When someone orders from Amazon, they’re planning. Comparing. Adding to the wishlist. Thinking for days. Finally buying.
When someone opens Blinkit? They need it NOW. The impulse is there. The wallet is out. They’re buying in 30 seconds.
That’s a different customer mindset. And if your product fits that urgency, you’re leaving money on the table by not being there.
But here’s the problem:
Most brands assume Blinkit works like Amazon. Fill a form. Upload products. Start selling.
Then they hit the registration process. And get confused. Documents rejected. Unclear requirements. Weeks of back-and-forth with no clarity.
I’ve seen brands spend 2-3 months just trying to figure out the onboarding process. Some give up. Some pay consultants. Some eventually figure it out but waste valuable time.
Why does this happen?
Because Blinkit (formerly Grofers) is fundamentally different. It’s not a marketplace where customers buy from you. It’s a quick commerce platform where Blinkit buys from you, stocks in their warehouses, and sells to customers in 10 minutes.
Different models. Different process. Different requirements.
After helping dozens of brands navigate this, I decided to write this guide. Everything you actually need to know about becoming a Blinkit seller. Real steps. Real timeline. Real mistakes to avoid.
Let’s get into it
How to Sell on Blinkit — At a Glance
- Check eligibility and product fit — Blinkit works best for impulse, daily-need items priced ₹500–₹3000.
- Keep documents ready — GST, PAN, FSSAI (for food), bank details, brand authorisation, and trademark.
- Register on the Blinkit seller portal at partner.blinkit.com and submit your business details.
- Get a Category Manager assigned, who approves your SKUs, pricing, and listings.
- Add Blinkit warehouses as APOB in your GST to enable inventory supply.
- Receive purchase orders, ship stock, and go live across dark stores.
Is Blinkit Right For Your Brand? Understanding Quick Commerce
Here’s a conversation I had last month with a furniture brand founder. Great guy. Doing well on Flipkart. He wanted to get on Blinkit because “everyone’s talking about quick commerce.”
I asked him: “When was the last time you ordered a dining table in 10 minutes?”
He laughed. Then he got it.
Quick commerce isn’t for everyone, and that’s fine. Blinkit seller registration works brilliantly for:
- Groceries and FMCG products
- Snacks that people crave at odd hours
- Personal care items you realize you need right now
- Beverages for sudden guests
- Small electronics and appliances you need urgently
Now, about that last point – let me clarify because this confuses people about selling on Blinkit.
When I say electronics work on Blinkit, I’m not talking about laptops or washing machines. Nobody’s buying those in 10 minutes. But think about the scenarios that actually happen:
Your hair dryer dies right before an important meeting. Your phone charger stops working and you’ve got 10% battery. You’re hosting a dinner party tomorrow and realize your air fryer isn’t working. The iron box gave up while you’re packing for a morning flight.
These are real, urgent needs. And they happen more often than you’d think in the quick commerce landscape.
I’ve seen brands selling hair straighteners, trimmers, phone accessories, small kitchen appliances, portable speakers – all doing surprisingly well on Blinkit. Why? Because when someone needs these things, they need them NOW. Not in 2 days with Amazon Prime. Now.
The sweet spot for Blinkit products is usually items between ₹500-₹3000. Anything beyond that, and people start comparing, reading reviews, thinking it over. The impulse factor drops.
The key question to ask yourself before starting the Blinkit onboarding process: “Would someone urgently need this product and be willing to pay a slight premium for 10-minute delivery?”
If the answer is yes, Blinkit might work for you. But if you’re selling products that need detailed explanation or are high-consideration purchases, maybe quick commerce isn’t your primary channel.
Who Can Sell on Blinkit? Seller Types Explained
Before you start the registration process, it helps to know which bucket your business falls into. Blinkit runs a curated model – it doesn’t onboard everyone. It looks for sellers who can hold consistent quality, keep stock stable, and stay compliant. In practice, five types of businesses get onboarded:
Manufacturers — If you produce your own goods, you can register directly. This is the cleanest route for FMCG, packaged food, beverage, home care, and personal care makers who want full control over pricing and distribution.
Brand owners — If you own a registered trademark (or it’s in process), you can list without going through a distributor. You keep authority over listings, pricing, and inventory planning.
Authorised distributors — You can sell on behalf of a brand as long as you hold a valid brand authorisation letter. This is common for large FMCG brands where regional distributors manage warehouse supply.
Importers — If you import products, you can sell too, provided you have the right import documentation, FSSAI approvals for food items, and India-compliant labelling.
D2C brands — Direct-to-consumer brands fit quick commerce well because of impulse buying and fast repeat orders. You’ll need GST, FSSAI where applicable, and proper packaging and barcoding.
If you’re none of these – say, an unbranded or generic reseller – Blinkit will usually not accept you. Branded, compliant products are the baseline.
Understanding Blinkit’s Two Selling Models: SOR vs Outright (OR)
Here’s something most guides don’t tell you and it’s probably the most important thing you need to know before you start the Blinkit onboarding process.”
Blinkit doesn’t work on a single seller model. There are two completely different commercial structures. And which one applies to your brand changes everything – your costs, your PO size, your risk, and your growth trajectory.
I see brands go through the entire Blinkit seller registration process without understanding this. Then they’re blindsided when the first invoice arrives. Let’s fix that.
Model 1 — SOR (Sale or Return): The Entry Model for New Brands
SOR stands for Sale or Return. This is the standard Blinkit onboarding model for new and emerging brands.
Here’s how it works in plain language: You pay Blinkit ₹25,000 per SKU per cluster as a PLA (Product Listing Advertisement) deposit. Blinkit credits this back to you as ₹25,000 in mandatory ad spend. So technically, the money doesn’t disappear — but it’s locked as advertising credit you must spend on the platform.
Each cluster covers 8–10 dark stores in a city. So if you’re listing in Mumbai and Delhi, that’s two clusters. Three SKUs across two clusters? You’re paying ₹1,50,000 upfront in PLA deposits.
Beyond the PLA, here’s what SOR sellers pay on an ongoing basis:
- Storage fees: ₹1 per unit per day sitting in Blinkit’s warehouse
- Inwarding / GRN charges: ₹5 per unit when your stock is received
- Fulfilment fees: ₹50 per delivered order
- Category commission: Variable, based on Blinkit’s rate card
And here’s the part that trips up most first-time Blinkit sellers: the next Purchase Order only comes 30 days after your first PO — and only if you’ve sold at least 80% of your current stock. Blinkit wants to see sell-through velocity before they invest more shelf space in your brand.
This is why fast-moving products win in the SOR model. If your product sits in the warehouse for 60 days, your storage fees pile up and your second PO gets delayed. The model rewards brands with genuine quick commerce demand.
If stock doesn’t sell, Blinkit returns it to you after 90–120 days depending on the category. This is called RTV — Return to Vendor.
Bottom line on SOR: It’s the right entry point if you’re a new or growing brand validating your quick commerce demand before committing to large volumes. Lower risk, smaller POs, but more costs to manage.
Model 2 — OR (Outright): The Scale Model for Established Brands
OR stands for Outright. This is a completely different game.
In the Outright model, Blinkit directly purchases your stock. They’re not selling on your behalf — they’re buying from you like a wholesale buyer. Large POs of 3,000 to 5,000 units. Coverage across 150 to 200 dark stores per cluster instead of just 8–10.
Think about what that means for reach. SOR puts you in a handful of dark stores in a city. OR puts you in almost every single one.
And the cost structure flips completely:
- No PLA deposit — no ₹25,000 per SKU requirement
- No storage fees — Blinkit owns the stock, Blinkit bears the cost
- No inwarding charges
- No fulfilment fees
- No category commission
So what do you pay? Mandatory advertising spend — a percentage of the PO value, agreed upon through something called an NPI sheet (New Product Introduction sheet) that you submit to Blinkit before the PO is raised. For example, on a ₹70 lakh PO, you might commit ₹3 lakh in advertising spend.
The next PO in the OR model isn’t on a fixed 30-day cycle. It’s velocity-based. The faster your product sells through Blinkit’s dark stores, the sooner the next PO arrives. Strong sell-through can mean a new PO in two weeks. Slow movement means a longer wait.
Bottom line on OR: It’s the model for brands that have already proven demand and are ready to scale nationally. The economics are significantly better — but you need to earn access to it. Blinkit evaluates your brand’s velocity data and category fit before offering OR terms.
SOR vs OR — Which One Applies to You?
I get this question from almost every brand I work with. Here’s the simple answer:
If you’re a new brand or haven’t sold on Blinkit before, you’re starting on SOR. That’s not a bad thing – it’s the right way to prove your product works in the quick commerce environment before Blinkit commits to buying thousands of units.
The OR model is earned, not chosen. Once you’ve demonstrated consistent sell-through velocity, strong category performance, and reliable fulfilment on SOR, Blinkit may offer OR terms. The transition is evaluated case by case.
Some brands grow from SOR to OR within 3–4 months. Others take longer. The key driver is always the same: how fast is your product actually selling?
Here’s a quick side-by-side so you can see the difference clearly:
| Parameter | SOR — Sale or Return | OR — Outright |
|---|---|---|
| Who it’s for | New / emerging brands | Established brands with proven velocity |
| PLA deposit | ₹25,000 per SKU per cluster | Not required |
| PO size | Small (demand-based) | 3,000–5,000 units |
| Dark store coverage | 8–10 per cluster | 150–200 per cluster |
| Storage fees | ₹1 / unit / day | None |
| Fulfilment fees | ₹50 / order | None |
| Category commission | Applicable | None |
| Ad spend | Mandatory (PLA credit) | Mandatory (% of PO value via NPI) |
| Next PO trigger | 30 days + 80% sell-through | Velocity-based |
| RTV (unsold stock) | 90–120 days | 90–120 days |
Blinkit Rate Card 2026: Commission Slabs by Selling Price
One more thing worth knowing: your commission rates on the SOR model vary by the selling price of your product. The structure is roughly:
- Products under ₹500 — approximately 2% commission
- ₹500 to ₹700 — approximately 6%
- ₹700 to ₹1,200 — approximately 13%
- Above ₹1,200 — approximately 18%
Products priced in the ₹500–₹1,200 range are where commission costs start to meaningfully impact your margins. Factor this into your pricing before you go live, not after.
To model your numbers properly, run them through our free marketplace calculator tools before you lock your selling prices.
Why This Matters More Than Most Brands Realise
I’ve spoken to founders who spent three months going live on Blinkit, started selling, and then were shocked by the economics. The product was moving. Revenue looked good. But after storage fees, inwarding charges, fulfilment fees, and commission — the margins weren’t there.
This isn’t a Blinkit problem. It’s a planning problem. The SOR cost structure is transparent — if you model it correctly before you onboard, you know exactly what margins to expect at different sell-through speeds.
The brands that win on Blinkit understand the model they’re on, price accordingly, and focus relentlessly on velocity. Because in quick commerce, speed of sale solves almost every problem.
Fast sell-through means lower storage costs. It means the next PO arrives sooner. It means Blinkit’s algorithm rewards you with better placement. And eventually, it’s what gets you offered the OR model.
So as you go through the Blinkit seller registration and onboarding process, keep one question in mind: how do I get my product selling as fast as possible in the first 30 days?
Everything else follows from that.
Understanding Blinkit Seller Fees and Commission Structure
The Blinkit seller fees structure catches people off guard. Let me break it down clearly.
Onboarding Fee: You pay ₹25,000 per SKU when you’re ready to list. But here’s what people miss – you get that same ₹25,000 back as advertising credit (Advertisement PLA). So technically, your upfront cost is mainly the inventory you’ll need to send.
One SKU means one variant. So if you’ve got Toor Dal in 500g and 1kg, that’s two SKUs. Plan your SKU count before paying the PLA deposit, since each variant is a separate ₹25,000 commitment.
Understanding Blinkit Commission Structure
Here’s something you should know about Blinkit commission rates – they vary by category and are charged when you make sales on the platform.
How commission works on Blinkit:
The commission is category-based. Different product categories have different rates. FMCG products typically have lower commissions (around 10-15%), while categories like electronics and personal care might be higher (15-25%).
When you list products, you’ll need to provide:
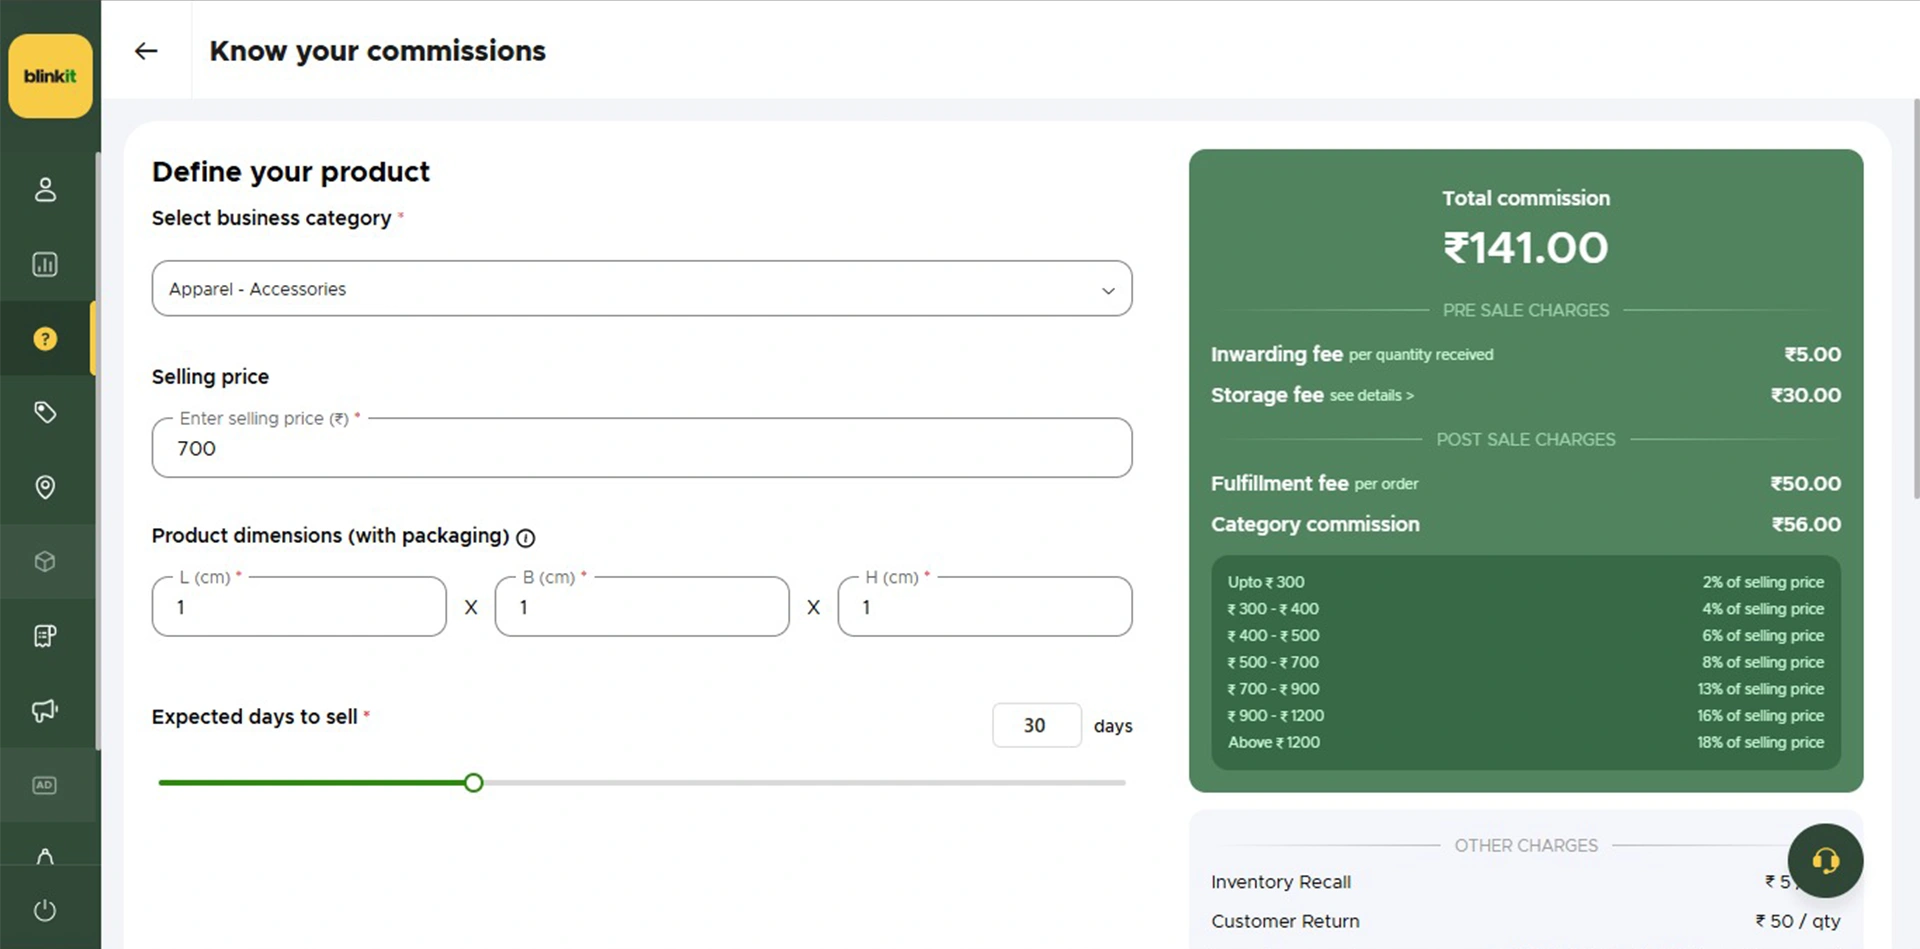
- Average Selling Price: Your typical selling price per unit on Blinkit.
- Product Dimensions with Packaging (L x B x H): This affects warehouse costs. Bigger products take more space in dark stores, impacting storage fees.
- Expected Days to Sell: Critical question – will your product sell within 30 days?
Why the 30-day timeline matters:
You pay warehouse charges for inventory sitting in Blinkit’s system. If your product sits for 60-90 days versus 30 days, storage costs add up significantly.
Quick commerce thrives on fast inventory turnover. Blinkit operates small, efficient dark stores optimized for 10-minute delivery. Every square foot is valuable.
Products that sell within 30 days get:
- Better shelf allocation
- Priority placement in dark stores
- Larger purchase orders
- Lower overall costs
Products that sit longer face:
- Higher warehouse charges
- Reduced allocation in future POs
- Possible delisting if velocity is too low
The commission and fee structure rewards products that fit the quick commerce model – impulse purchases with fast inventory turnover.
The Complete Blinkit Onboarding Process: Step-by-Step
Let me break down the actual Blinkit onboarding process as it happens. This is the real flow, not the sanitized version.
Step 1: Registration Form and Business Documentation
The first step in Blinkit seller registration is filling out a comprehensive registration form. This isn’t just basic details – Blinkit wants complete business information.
You begin at Blinkit’s official seller portal, seller.blinkit.com, where you’ll fill out the registration form.
What you need to provide:
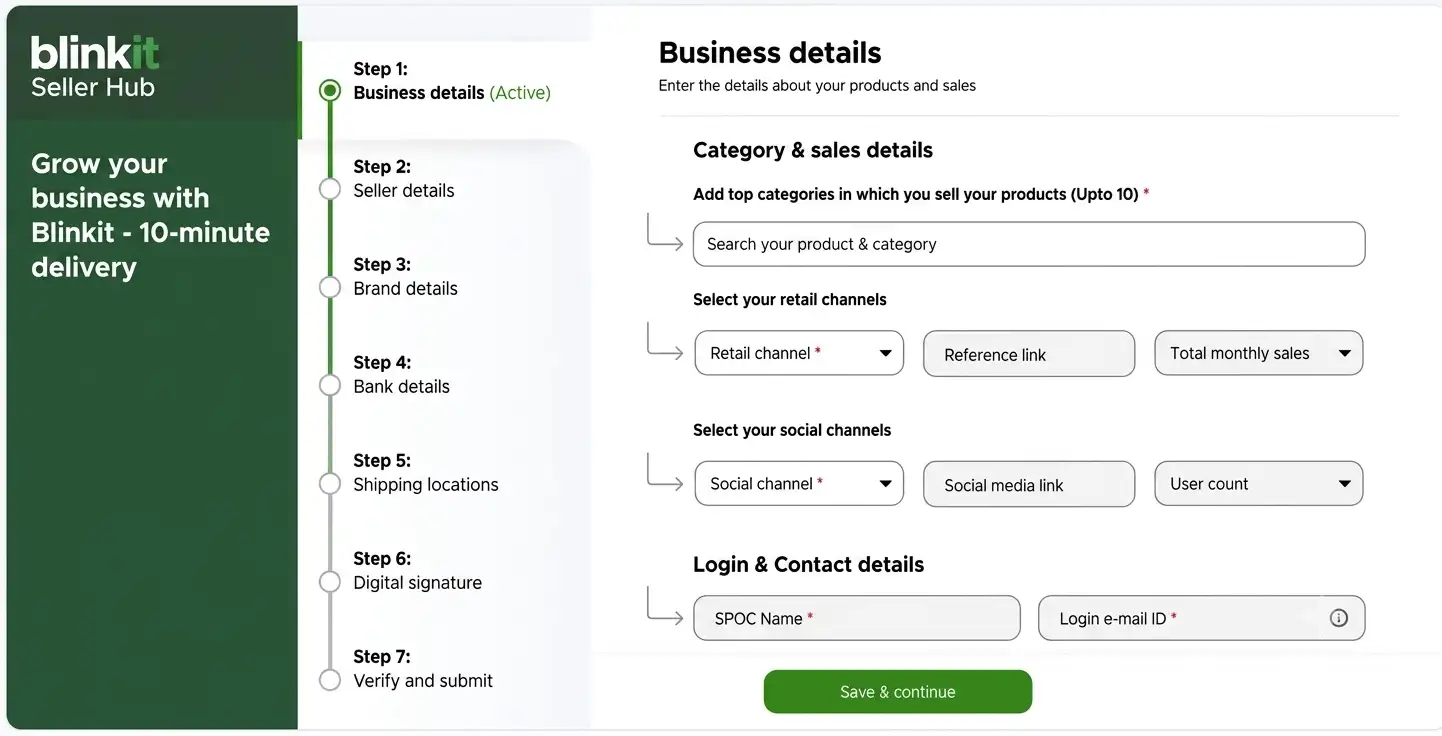
- Complete business details and company information
- Seller information (authorized person details)
- Brand details you want to register
- Bank account information for settlements
- Shipping location details (your warehouse address)
- Digital signature for verification
This is more detailed than most marketplaces. Take your time filling this out. I’ve seen applications delayed because of incomplete information or mismatched details.
Double-check everything before submitting your Blinkit seller registration.
Documents Required to Sell on Blinkit
Most onboarding delays I see come down to one thing – incomplete or mismatched documents. Get this checklist ready before you start the form, and you’ll move through verification far faster. Keep everything in clean PDF or JPG, and make sure the business name matches exactly across every document.
| Document | Requirement |
| GST Number (GSTIN) | Mandatory for all sellers |
| PAN Card | Individual or business PAN |
| FSSAI License | Mandatory for food & beverage categories |
| Bank Account + Cancelled Cheque | Mandatory (for settlements) |
| Brand Authorisation Letter | Required if you are not the brand owner |
| Trademark Certificate | Required for brand registration |
| APOB (Additional Place of Business) | Required for supplying to Blinkit warehouses in each state |
A quick word on the last row – APOB trips up almost every first-time seller, so I’ve explained it in its own section below. Don’t skip it; without it, Blinkit literally cannot send you a purchase order.
Step 2: Approval and Agreement Process
Once you submit, Blinkit reviews your application. If approved, here’s what happens next:
You’ll receive an email with a formal agreement. This isn’t just a click-and-accept situation. You need to:
- Fill in your business details on the agreement
- Provide authorization for your brand
- Print the agreement on your company letterhead
- Get it signed by authorized signatory
- Share the signed document back with the Blinkit team
This step is crucial for becoming a Blinkit seller. The agreement establishes the legal framework for selling on Blinkit. Don’t rush through it – read the terms carefully, especially around commission rates, payment cycles, and inventory ownership.
The Category Manager (CM): Why You Can’t Go Live Without One
Here’s something that genuinely surprises brands coming from Amazon or Flipkart – on Blinkit, you don’t just upload your catalogue and go live. Once your application is approved, Blinkit assigns you a Category Manager, or CM. This person becomes your single most important contact on the platform.
The CM is the gatekeeper. Nothing goes live without their sign-off. Specifically, the Category Manager approves your SKUs, helps map your products to the right categories, negotiates margins and trading terms, guides you on pricing and pack sizes, reviews how your products perform, and schedules your marketing campaigns and visibility slots.
My advice: treat the CM as a strategic partner, not a formality. The brands that grow fastest on Blinkit are the ones who keep their CM updated, act on pricing and pack-size feedback, and stay responsive. Ignore the CM’s inputs and your approvals slow down, your visibility drops, and your campaigns get deprioritised. Build that relationship early.
Step 3: Product Onboarding Process
Blinkit follows a structured 4-step product listing process:
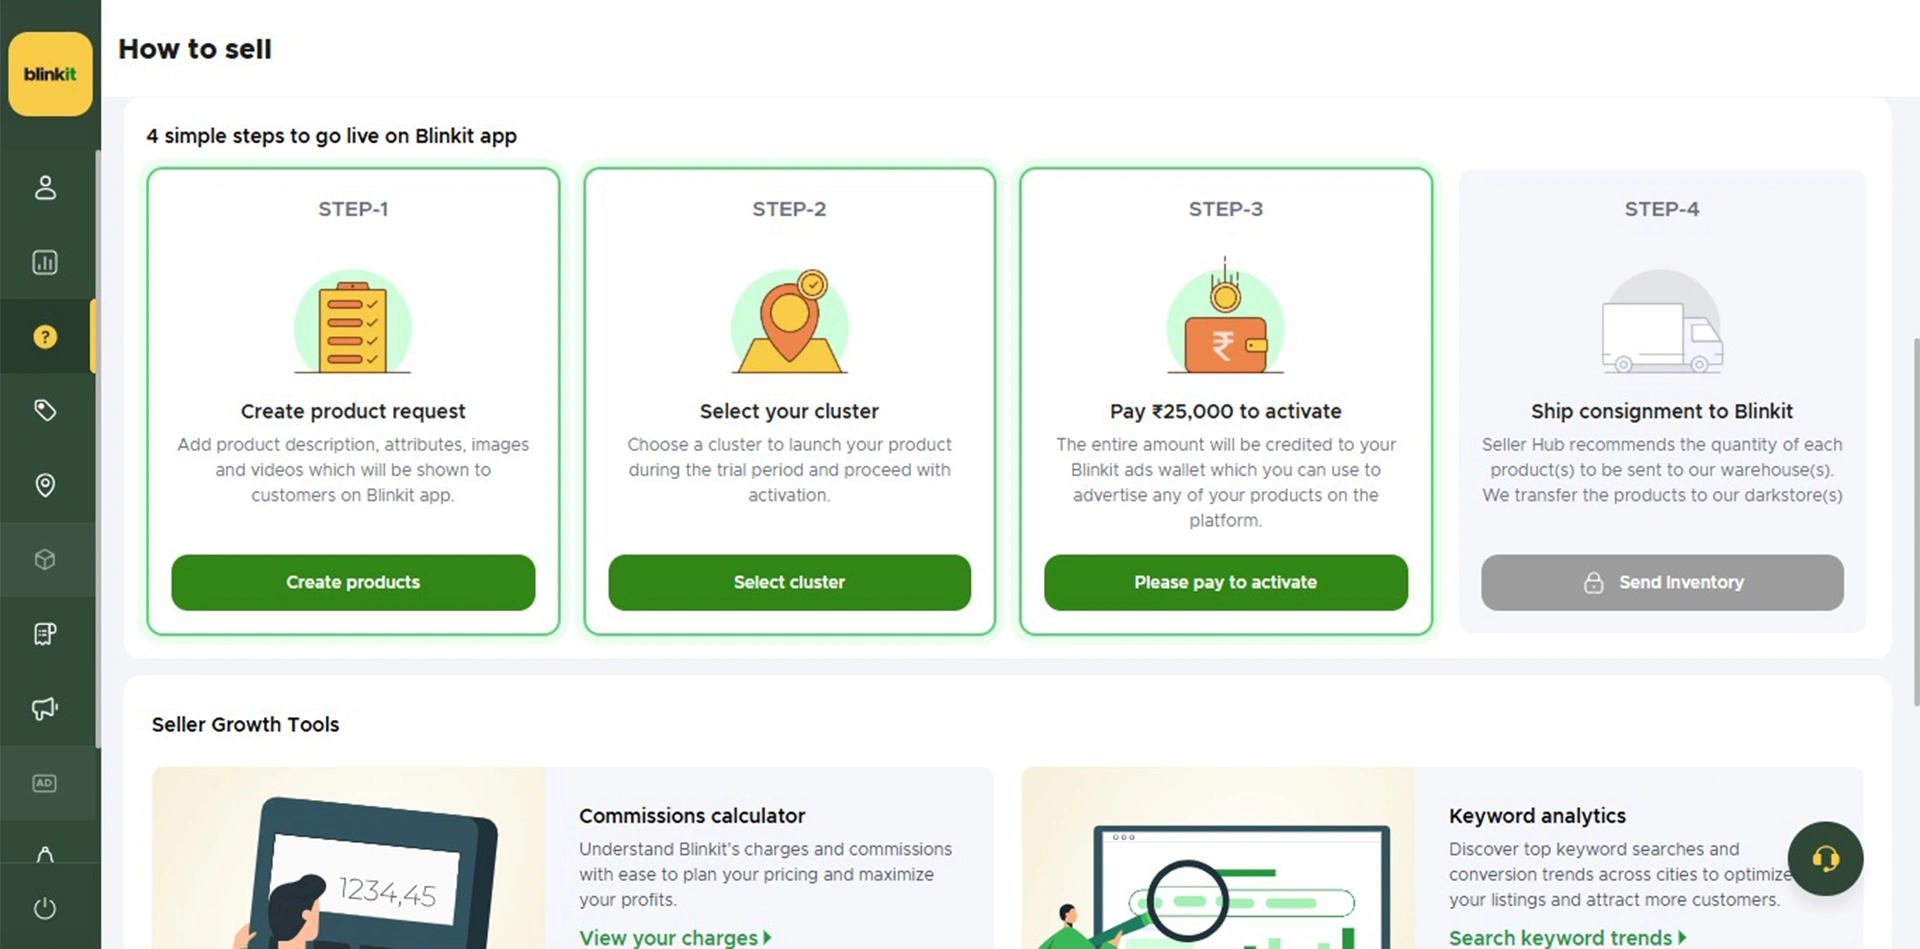
Once your agreement is sorted, you enter the actual product listing phase. Blinkit follows a structured 4-step process:
Step 3a: Create Product Request
This is where you upload your product catalog for the Blinkit platform. You’ll need:
- Product names and descriptions
- High-quality product images (white background, clear visibility)
- MRP and selling price
- Product barcodes (EAN/UPC codes)
- HSN codes for tax purposes
- Product specifications and attributes
Remember, Blinkit customers scroll fast. Your product images need to grab attention in 2 seconds on the quick commerce app.
Step 3b: Select Cluster (Warehouse Location)
This is a critical decision in selling on Blinkit. You’re selecting which city and warehouse you want to operate from.
For example, if you select Bangalore, you’re committing to send inventory to Blinkit’s Bangalore warehouse. Your products will only be available to customers in that city initially.
My advice? Start with one city where your logistics is strongest. Don’t overextend. I’ve seen brands select multiple cities on day one and then struggle with inventory management across locations.
The beauty of quick commerce is you can always expand later. But you can’t fix a damaged reputation from missing dispatch appointments.
Step 3c: Pay ₹25,000 per SKU (Advertisement PLA)
Now comes the payment. You pay ₹25,000 per SKU as your onboarding fee. This amount is credited back to you as Ader PLA – your advertising budget on the Blinkit platform.
Example: If you’re listing 5 SKUs (let’s say 1kg Toor Dal, 500g Toor Dal, 1kg Moong Dal, 500g Moong Dal, and 1kg Chana Dal), you’ll pay ₹1,25,000 upfront. But you also get ₹1,25,000 in ad credits to use for promoting your products on Blinkit.
Use these ad credits wisely. Many brands forget about them or use them ineffectively. We’ll talk about advertising strategies later in this guide.
Step 3d: Receive and Fulfil the First Purchase Order
Once your products are approved and payment is done, Blinkit raises a Purchase Order (PO). This is typically for 100-150 units initially, depending on your product and selected cluster.
Here’s where the process gets specific:
Mandatory Exit Time Coordination: Your delivery partner must share the exit time and date with Blinkit. This is not optional. Blinkit needs to know exactly when your shipment is leaving your warehouse so they can prepare to receive it at their warehouse.
This coordination is mandatory because Blinkit operates on tight schedules in quick commerce. Their receiving teams need to plan for your inventory arrival.
Step 4: Ship Inventory to the Blinkit Warehouse
You ship your inventory to the designated Blinkit warehouse based on your cluster selection. Make sure your packaging meets Blinkit’s specifications – sturdy cartons, proper labeling with batch numbers, manufacturing dates, and expiry dates.
Show up on time. With exact quantities as per the PO. First impression matters as a Blinkit seller.
APOB Registration: Why GST Multi-State Setup Is Mandatory
APOB stands for Additional Place of Business, and it’s one of the most overlooked steps in the entire Blinkit onboarding process. Skip it, and everything downstream stops – no purchase orders, no inwarding, no sales.
Here’s why it exists. Blinkit operates through regional warehouses spread across different states. Under GST rules, if you want to store, supply, or dispatch goods from any location other than your primary registered address, that location must be added to your GST registration as an Additional Place of Business. Blinkit’s warehouses are exactly that – inventory holding and dispatch points – so each one has to show up on your GST portal as your additional business location.
How it works in practice: Blinkit shares the warehouse address for every region where your products are approved. You then add each of those warehouse addresses as an APOB under your GST registration for that specific state. Only after the GST department approves the APOB can you deliver inventory to that warehouse, get your stock inwarded, raise valid tax invoices, and receive purchase orders.
What happens if you don’t add it? Blinkit can’t issue a PO, your stock gets rejected at the warehouse, inwarding is blocked, and your onboarding simply stays incomplete. If you plan to sell across multiple cities – say Delhi NCR, Mumbai, Bengaluru, Hyderabad – you’ll need an APOB for each state where Blinkit has a warehouse. So start the APOB process the moment you’re onboarded, because GST approvals can take days or weeks depending on the state. Don’t wait for the PO to chase it.
Step 5: Distribution to Dark Stores and Going Live
Once your products reach the Blinkit warehouse, they don’t immediately go live on the app. Here’s what actually happens:
Blinkit disperses your inventory from the mother warehouse to multiple dark stores across the city. These dark stores are small fulfillment centers strategically located for 10-minute delivery.
Your Blinkit product listing goes live only when inventory physically reaches the dark stores and is scanned into their system. This distribution typically takes 1-3 days.
So if you’re refreshing the Blinkit app wondering why customers can’t see your products yet – they’re in transit within Blinkit’s network. Be patient.
Once products hit the dark stores, you’re officially live on Blinkit.
Blinkit Advertising Options? How to Boost Sales
Once you’re live on the Blinkit platform, visibility is everything. You have ₹25,000 per SKU in ad credits – here’s how to use them effectively.
Blinkit offers two types of advertising campaigns:
1. Product Booster (Sales & Visibility)
This is your primary tool for driving sales on Blinkit. Product Booster campaigns push your specific products higher in search results and category pages.
When to use Product Booster:
- Right after going live (first 30 days are crucial)
- When launching new SKUs on Blinkit
- During seasonal peaks or festivals
- To compete with established brands in your category
The algorithm favors products with good sales velocity. Use Product Booster to kickstart that momentum. Once your products start selling organically, you can reduce ad spend.
2. Brand Recommendation (Brand Presence)
This focuses on building overall brand awareness on the Blinkit platform rather than pushing individual products.
When to use Brand Recommendation:
- If you have multiple SKUs on Blinkit
- Building long-term brand recall
- Establishing credibility in quick commerce
- Creating differentiation from competitors
Think of Product Booster as performance marketing (immediate sales) and Brand Recommendation as brand building (long-term positioning).
My recommendation? Start with Product Booster for your top 2-3 SKUs. Get sales moving. Build reviews. Then layer in Brand Recommendation once you have some traction.
Once your campaigns are live, our full guide on running profitable ads on Blinkit, Zepto and Instamart breaks down budgets, keyword bidding and ROAS benchmarks in detail.
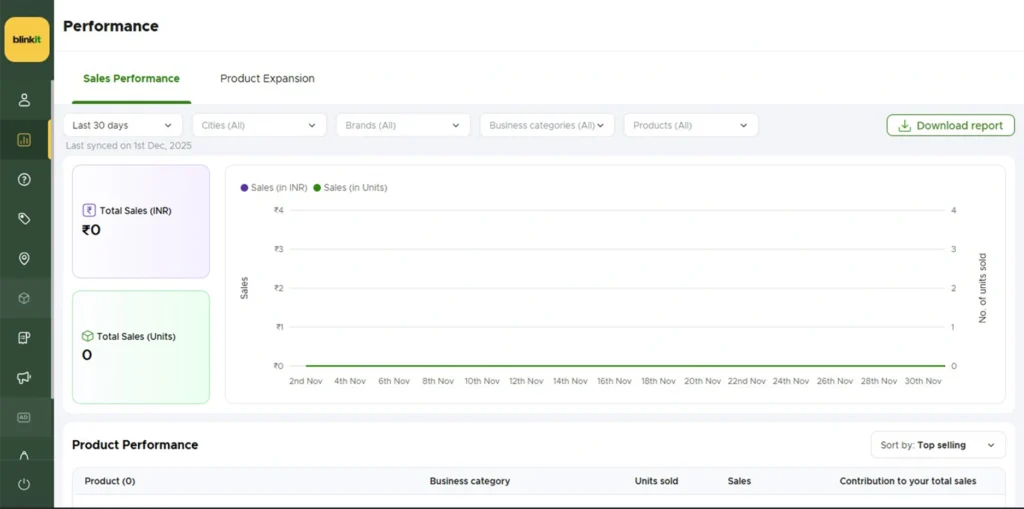
Blinkit Seller Hub: Tracking Sales and Planning Inventory
One massive advantage of selling on Blinkit is the real-time sales tracking inside your Blinkit Seller Hub dashboard.
You can monitor:
- Daily sales by SKU
- Which dark stores are moving inventory fastest
- What times of day see peak orders
- Inventory levels across locations
- Reorder patterns and velocity
Why this matters: You can plan your inventory in advance. If you see a particular SKU selling 50 units per day, you know you need to keep at least 1500 units in stock for the month. Plus buffer for growth.
Track your data closely in the first 60 days. You’ll start seeing patterns – which products move fastest, which days see higher sales, which dark stores need more stock.
Use this data to optimize your inventory planning and avoid stockouts on the Blinkit platform.
Blinkit Seller Payouts and Settlement Cycle
Once orders start flowing, the next question every seller asks is – when do I get paid? Blinkit follows a twice-a-month payout cycle, which keeps cash flow fairly predictable compared to some marketplaces.
A few things to keep in mind on settlements. Blinkit deducts your category commission before payout, and depending on your model, fees like storage, inwarding, and fulfilment are adjusted here too. Any brand-funded discounts or promotional price drops you’ve agreed to are also deducted from the settlement. And on the tax side, Blinkit deducts TCS (Tax Collected at Source) at 0.5% on every payout, which you can claim back as credit when you file your GST returns.
Everything is visible inside your Blinkit Seller Hub – completed orders, earnings, deductions, commission breakups, and settlement timelines. Check it regularly. The sellers who reconcile their payouts every cycle catch pricing leaks early; the ones who don’t usually discover months later that their margins were thinner than they assumed. Model your fees and commission before you go live, then verify against actual settlements once money starts moving.
Boosting Sales Performance: Advanced Strategies for Blinkit Sellers
Getting listed is just the start. Here’s how to actually succeed on Blinkit and maximize your quick commerce revenue.
Maintain a High PO Fill Rate (Critical for Success)
Your PO fill rate is one of the most important metrics for Blinkit sellers. When Blinkit raises a Purchase Order, they expect you to fulfill it completely and on time.
If the PO says 500 units, you need to send exactly 500 units. Not 450. Not “we’ll send 50 more next week.”
Reserve Dedicated Inventory for Quick Commerce
Why PO fill rate matters:
- Blinkit prioritizes reliable sellers for future POs
- Low fill rates reduce your inventory allocation
- It affects your visibility on the platform
- Damages your reputation in quick commerce
How to ensure 100% fill rate?
Reserve dedicated inventory in your warehouse specifically for quick commerce platforms like Blinkit and Swiggy Instamart. Don’t pull from the same inventory pool as your other sales channels. This prevents stockouts when Blinkit raises urgent POs.
This is where tools like Unicommerce’s quick commerce solution become valuable. It helps you segregate and manage inventory specifically for quick commerce fulfillment, ensuring you never miss a Blinkit PO due to inventory allocation issues.
Sync Inventory Between Mother Warehouse and Dark Stores in Real Time
This is the game-changer most Blinkit sellers overlook: real-time inventory syncing between mother warehouse and dark stores.
Here’s why it matters:
Problem 1: Inventory Going Offline During Peak Hours
Let’s say your product sells consistently from 6 PM to 10 PM (dinner prep time). But you don’t know at what exact time your inventory goes offline in which dark store. You’re losing sales and don’t even realize it.
With real-time inventory tracking, you’ll know exactly when each dark store hits low stock levels. You can coordinate with Blinkit for faster replenishment to the high-velocity dark stores.
Problem 2: Running Ads with No Inventory?
This is painful and I’ve seen it happen repeatedly. You launch a sponsored campaign on Blinkit. Your ads are running. Customers are clicking. Your product starts selling faster than expected.
Then suddenly, you go offline due to limited inventory. Your ad budget is wasted. Customers who wanted to buy can’t find your product. You’ve lost both money and potential customers.
The solution: Real-time inventory synchronization lets you see inventory levels across all dark stores continuously. You can:
- Identify which dark stores need urgent replenishment
- Plan your inventory dispatch in advance
- Coordinate with Blinkit before you hit zero stock
- Time your ad campaigns when inventory is abundant
- Avoid wasting ad spend when stock is low
Tools that sync inventory data help you make smarter decisions. Instead of reacting to stockouts, you’re preventing them. Instead of guessing when to send more inventory, you’re planning based on real data.
Monitor Dark Store Performance
Not all dark stores perform equally. Some locations naturally have higher demand for your products.
Track which dark stores are moving inventory fastest. Work with Blinkit to allocate more stock to high-performing locations and less to slow movers. This maximizes your revenue potential and minimizes warehouse holding costs.
Optimize Your Product Mix Based on Data
After 60-90 days on Blinkit, you’ll have clear data on what’s working and what’s not.
If a SKU consistently underperforms despite advertising, consider replacing it with something else. You only have 20 SKU slots – use them for winners.
Double down on products showing strong organic growth. Increase their inventory. Promote them more. Make sure they’re always in stock on the Blinkit platform.
Common Mistakes That Kill Blinkit Seller Success
Treating Blinkit like Amazon: Blinkit is not a list-and-wait marketplace. You’re fulfilling bulk POs, managing warehouse appointments, working with a fundamentally different fulfillment model. Adjust your approach.
Poor inventory planning: Running out of stock on Blinkit means you disappear from search results. All your momentum dies. Plan inventory with buffers. Use real-time tracking to avoid stockouts.
Ignoring ad credits: That ₹25K per SKU is real money sitting in your account. Use it strategically in the first 60 days. Don’t let it expire unused.
Selecting too many cities initially: Start with 1-2 cities. Master the operations. Then expand. Overextending early leads to missed appointments and damaged reputation.
Low quality product images: Quick commerce is visual. Customers scroll fast. Your images need to be crisp, clear, and compelling. Invest in good product photography for the Blinkit platform.
Missing dispatch appointments: When you commit to an exit time for shipment, honor it. Your delivery partner must coordinate with Blinkit. Missing these mandatory coordination steps delays everything.
Not tracking dark store performance: Monitor which locations sell your products fastest. Optimize your inventory allocation accordingly.
Final Thoughts, Your Blinkit Seller Journey
Quick commerce is not a fad. It’s fundamentally changing how urban India shops. And Blinkit is leading this revolution.
But success on Blinkit requires understanding that this isn’t Amazon or Flipkart. The rules are different. The fulfillment model is different. The customer mindset is different.
If fashion is your category, the playbook changes again — our guide on how to sell on Myntra walks through that marketplace end to end.
Keys to Blinkit seller success:
- Start focused with cities and SKUs
- Maintain high PO fill rates (reserve inventory for quick commerce)
- Implement real-time inventory tracking
- Use your ad credits strategically
- Monitor performance data closely
- Expand based on proven success
The brands winning on Blinkit are the ones who understand the quick commerce model deeply, execute consistently, and use data to make smart inventory decisions.
Getting listed on Blinkit is just the beginning. Real success comes from maintaining high fill rates, keeping inventory flowing smoothly to dark stores, preventing stockouts, and using your advertising budget effectively.
The 10-minute delivery promise isn’t marketing hype. It’s genuinely changing consumer behavior in India. Being part of that change, reaching customers faster than ever before, is exciting.
Now go complete your Blinkit seller registration. Follow this process step-by-step. Avoid the common mistakes. And build a successful quick commerce business on the Blinkit platform.
Ready to start selling on Blinkit? Begin your onboarding today and tap into India’s fastest-growing quick commerce opportunity.
And if you’d rather have a team run the whole process for you, our Quick Commerce Enablement service handles onboarding, listings and stock planning across Blinkit, Zepto and Instamart.
Frequently Asked Questions — How to Sell on Blinkit
Quick answers to the most common questions about Blinkit seller registration and onboarding in India. Need expert help? Our Blinkit onboarding service gets your brand live in 7 days.
1
How do I register as a seller on Blinkit?
You register through Blinkit's Partner Portal at partner.blinkit.com. You need your GSTIN, FSSAI license (for food or grocery products), trademark certificate or brand authorization letter, and active bank account details. Approval typically takes 7 to 21 working days after document verification.
2
What is a dark store on Blinkit and how does it work?
A dark store is a small warehouse-style fulfillment center that Blinkit operates in residential areas — it is not open to walk-in customers. Your inventory is stocked at the nearest dark store, and Blinkit's delivery partners pick and deliver orders to customers within 10 minutes.
3
What is Blinkit's commission rate for sellers in 2026?
Blinkit charges 5 to 18 percent commission depending on the product category. Grocery and staples attract lower rates, while personal care and electronics accessories are on the higher end. Additional platform fees and per-order packaging charges may also apply.
4
Do I need a trademark to sell on Blinkit?
Yes. Blinkit requires either a registered trademark certificate or a valid brand authorization letter from the brand owner if you are a distributor or reseller. Unbranded and generic products are generally not accepted on the platform.
5
Is GST mandatory to sell on Blinkit?
Yes, a valid GSTIN is mandatory to onboard as a Blinkit seller. Blinkit deducts TCS (Tax Collected at Source) at 0.5 percent on every settlement payout, which you can claim as a credit when filing your GST returns.
6
Which product categories are allowed on Blinkit?
Blinkit accepts grocery, dairy, fruits and vegetables, packaged food, beverages, personal care, household essentials, baby care, electronics accessories, and pet care products. Alcohol, prescription medicines, and unpackaged loose items are not permitted on the platform.
7
How long does Blinkit seller onboarding take?
With complete and correct documents, onboarding takes 7 to 21 working days. Common delays are caused by incomplete brand authorization, FSSAI license mismatch, or packaging not meeting Blinkit's label requirements. Working with a Blinkit onboarding agency significantly reduces rejection risk and speeds up go-live.
8
Can I sell on Blinkit without GST?
No. A valid GSTIN is mandatory to onboard as a Blinkit seller. Blinkit issues GST invoices, collects tax, and deducts TCS on payouts, so GST registration is compulsory even if your turnover is below the normal exemption limit. Selling through an online marketplace makes GST registration mandatory regardless of turnover.
9
What is APOB and why is it required for Blinkit?
APOB stands for Additional Place of Business. Because Blinkit stores and dispatches your stock from regional warehouses, you must add each warehouse address to your GST registration as an APOB for that state. Without an approved APOB, Blinkit cannot raise purchase orders, your stock won't be accepted at the warehouse, and your onboarding stays incomplete.
10
What does a Blinkit Category Manager do?
After approval, Blinkit assigns you a Category Manager (CM) who is your main point of contact. The CM approves your SKUs, maps products to the right categories, negotiates margins and trading terms, advises on pricing and pack sizes, and schedules your marketing campaigns. You cannot go live on Blinkit without CM approval, so treat them as a strategic partner.
11
What are the best products to sell on Blinkit?
Blinkit is built for instant, daily-need purchases, so high-frequency items perform best — groceries and staples, dairy and bakery, snacks and beverages, personal care and hygiene, baby care, household cleaning supplies, and small urgent-need electronics accessories. Products customers run out of or need urgently tend to sell fastest in the quick commerce model.
12
How are Blinkit seller payouts processed?
Blinkit follows a twice-a-month payout cycle to your registered bank account. Commission, applicable fees, and any brand-funded discounts are deducted before payout, and TCS at 0.5% is deducted on each settlement, which you can claim back when filing GST. All earnings and deductions are visible inside the Blinkit Seller Hub.
13
Do I need GS1 barcodes to list on Blinkit?
Blinkit strongly prefers GS1-standard barcodes (EAN/UPC) because they keep picking, packing, scanning, and inventory tracking accurate. Non-standard or duplicate barcodes often cause inwarding failures and higher return-to-vendor rates, so it's best to use proper GS1 barcodes from the start.
14
What is the difference between SOR and OR on Blinkit?
SOR (Sale or Return) is the entry model for new and emerging brands — smaller purchase orders, a PLA deposit per SKU, and ongoing storage, inwarding, fulfilment, and commission fees. OR (Outright) is the scale model where Blinkit buys your stock directly in large quantities with no PLA deposit, storage, or fulfilment fees. OR is earned once you prove consistent sell-through velocity on SOR.
15
How much investment is needed to start selling on Blinkit?
On the SOR model, the main upfront cost is the PLA deposit of ₹25,000 per SKU per cluster — which comes back to you as advertising credit — plus the inventory you ship for the first purchase order. Beyond that, budget for storage, inwarding, fulfilment, and category commission. Your real working-capital need depends on how many SKUs and clusters you launch with.
Still have questions about selling on Blinkit?
Global Websters has onboarded 50+ brands on Blinkit — from document prep to dark store go-live. Get expert help today.
Get Blinkit Onboarding Help →